
Autumn is here in Australia; in fact, we’re just two short weeks away from the start of winter. The days are short, the mornings are cool (approaching zero at times) and the leaves on the tree out front of our house have all dropped. Yep, sounds like harvest time! What will we harvest, you ask? Well, our lemons are getting bigger by the day, but they’re not quite ripe.
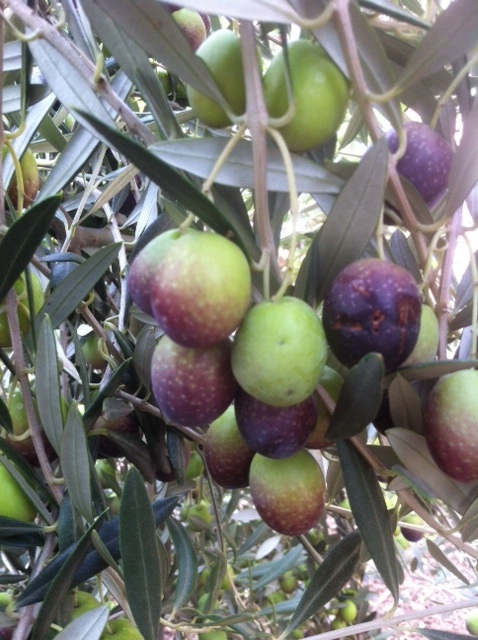
This is a serious “before” picture – i.e., before they are picked, washed, brined, cured and bottled.
No, our current harvest is thanks to our friends Joy and Brent, who are now enjoying the Canadian summer (well, except for a bit of snow in Canmore recently… we tried not to laugh!). We spent a Saturday afternoon picking olives in their orchard (i.e., 3 trees at the side of their home here in Wagga) along with their house-sitter (and Lisa’s research assistant) Denise. And for our hard work we were treated to some amazing tapenade (made with the remnants of last year’s harvest) and they sent us home with a huge bucket of olives to test our pickling skills. It was a bumper crop this year of St. Helena and Manzanillo olives! How amazing – and how lucky for us to have such great friends. We will enjoy sharing a jar with them on their return to Wagga.
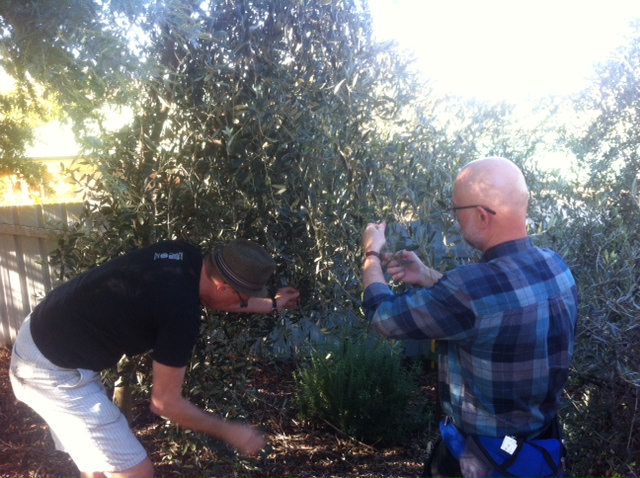
Did you know that being a visiting scholar here in Wagga involves hands-on experience in fruit-picking? Donald Case (right) found out the hard way that he was expected to work on the land in addition to giving seminars! Just a normal day for Dan though…
The first step was to find some containers large enough to hold the olives for the 14 day brining process. Lisa had fond memories of her mom and dad’s annual pickling events when she was a child; they used a crock pot with a specific plate to hold the cucumbers in place. Did we have such a thing? No. And, in fact, we needed 3 such things; we have a LOT of olives and we wanted to be able to separate the two types into different containers. After much digging around in cupboards and pondering a trip to Bunnings, we found some large vases to suit the purpose. Dan got crafty when we realized we didn’t have plates that would fit inside, to keep the olives from floating; he cut some circular discs from an old Aussie Post box and then weighted some bowls with river rocks. An ideal system!

We did this every day for two weeks! Don’t tell Oz Post about the creative use of their logo.
The first step in the process was to wash the olives, remove any stems and prick holes into every one. Yes, every, single olive! This took about 3 hours. By the end of the morning, our hands were wrinkled (from holding the cold fruit) and sore (from pricking our fingers instead of the olives, one too many times!). Once that was done, we divided the olives into containers, boiled the salt water and poured the cool brine onto the olives. The containers then sat in the pantry for two weeks; we dutifully pulled them to the kitchen each day to drain the old brine, boil new brine, and soak once more. Rinse, rebrine, repeat… for 14 days. This may sound onerous, but it’s not; 10 minutes out of our lives each day and soon to be rewarded with our very own olives — ready to serve on the patio when friends come to visit!

Once the olives are in jars (with a few tasty additions…like fresh ginger!) we top them with olive oil.
Well, that’s the hope. Of course, Joy and Brent have been doing this successfully for a few years now, so we have it on good authority that all will be well! The next step is really just a waiting game, as the olives now sit in the fridge in their jars, taking on the various flavours we’ve added to them. Once the brining stage was finished, we then had to prepare the canning jars and make some decisions about what to add to the mix. The olives go into a jar with some fresh brine, you add the flavours of your choice, and you top with some olive oil to seal everything inside. We decided to go with some classic flavours, so we have jars of lemon, chili, ginger and garlic olives, as well as a few plain ones (i.e., the ‘control’ group, for you researchers out there!).

The finished product! Hope they taste as good as they look.
They will now sit and cure for the next few weeks… and we’ll still be enjoying them when spring is just around the corner. You’re welcome to come visit for a taste-test! And who knows… this may lead us to embark on other canning adventures. Cherries in port, preserved lemons, tomato sauce… there is a rich bounty here in Oz, so we may just decided to put the empty olive jars to good use next summer. And, of course, we’ll blog all about it! Oh, and we did run out and buy three of our very own olive trees to plant in the backyard; we’ll see how those go, next year. In the meantime, here are a couple of other pictures from our olive adventure:

We had to stretch right into the tree to be sure to pick every last olive!

This was just one of the bins that we picked. They look great off the tree, but you can’t eat them – they are far too bitter at this stage!

Looks delicious! Why do you have to prick them? Will they not brine without doing that?
The skins are quite firm, so pricking the olives allows the brine to soak in a bit better. They look horrible at first – small holes with bruises around the edges – but these disappear over time, so you’d never know that the holes were there!